What You’ll Need
A list of required personal equipment accompanies every RMI program, and the thought process behind each item is much greater than simply “preparing for the worst and hoping for the best.” The list for your program takes into account factors such as: seasonality, route conditions, weather, elevation and more. As such, this list is framed within the broadest of contexts and is dynamic by its very nature. Therefore, certain variables (additions and/or subtractions) are inherent within such an all-encompassing list. We make every effort to recommend only top of the line clothing and technical gear and it is never our intention for you to buy or rent unnecessary gear.
The Guide Pick is an example of the listed item, giving you an idea of the material and specifications of the item. This exact item does not need to be purchased or used; however, any item you choose must have similar characteristics and performance abilities to the Guide Pick.
RMI Guides concur on the potential necessity of every item, thus every item on the list is required at gear check. However, guides may also have suggestions derived from their experience, some of which will vary from a given list. The guides’ recommendation whether to bring along or leave behind certain item(s) comes during the gear check, when the team first meets. Occasionally this recommendation comes at the expense of having previously purchased an item. If a guide presents the option of leaving behind certain item(s) on the list of required equipment, it is for a reason. Their recommendation may be related to the weather, route conditions, freezing level, perceived strength of the party, or desired pack weight.
Ultimately, there will never be a consensus for a “perfect” equipment list for an ascent. It does not exist because of the multitude of variables faced by climbers throughout the climb. Please follow this equipment list closely so that you will arrive for the gear check with all the required items. Keep in mind the list is not black and white, fine tuning will occur once you meet with your guide. Have a great climb!
-
 Most of the required equipment is available for rent or purchase from our affiliate Whittaker Mountaineering. RMI climbers receive a 10% discount on new clothing and equipment items ordered from Whittaker Mountaineering.
Shop Your Equipment List // Rent new equipment for your climb
Equipment List
Pack & Travel
120+ liter bags made of tough material with rugged zippers. One duffel will be used as your "trek duffel" to hold all your personal overnight gear and will be carried by our mountain staff between camps. The other duffel will be left at the hotel with extra gear and clothing.
Bring as needed. Make sure these are TSA-compliant.
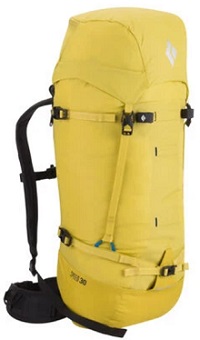
You'll use this backpack to carry your personal gear needed on the trail (warm jacket, hard shells, water, camera, etc.) not including any of the gear that will be carried by our mountain staff (sleeping bag, extra clothes, etc). This can also be used as a carry-on and while traveling or sightseeing.
A 25+ liter day pack to use as carry-on or while sightseeing. This will not be used on the trek. If you have some other preferred way to carry a few miscellaneous items, then there is no need to bring this day pack.
Sleeping Bag & Pad
We recommend a bag rated between 20° and 0° F. Allow ample room for movement. We recommend down over synthetic for its light weight, warmth, and packability. If you know you sleep cold, consider a 0° F bag.
A full-length inflatable pad.
A full-length closed cell foam pad, used in combination with the inflatable sleeping pad.
Technical Gear
We recommend lightweight, collapsible poles.
Head
A hat without a button on top will fit better and be more comfortable under a helmet.
A Buff provides versatile head and neck protection. A neck gaiter is also acceptable.
Start with fresh batteries and bring extra set(s) of batteries appropriate to the duration of the trip.
Glacier glasses are protective sunglasses that provide close to 100% frame coverage (wrap-around frames and side shields ensure no light can enter from the top, bottom, and sides of the glasses) and transmit less than 10% of visual light.
Hands
Each glove layer is worn separately as conditions change during the climb.
Light weight liner or softshell gloves. Lighter colors absorb less sunlight while still offering UV protection.
Wind- and water-resistant, insulated mountain gloves.
Wind- and water-resistant, insulated gloves or mittens. These also serve as emergency backups if you drop or lose a lighter-weight glove.
Upper Body
We recommend a minimum of five upper body layers, all of which can be used in conjunction with each other. Two of these should be insulating layers, one light, and one medium, that fit well together. Today there are many different layering systems to choose from, including fleece, softshell, down, and synthetic options.
Long-sleeve wool or synthetic top. Light weight, light-colored, hooded baselayers (sun hoodys) are highly recommended for sun protection.
One step up in warmth and bulk from a baselayer. A technical fleece makes an ideal light weight insulating layer.
A down, synthetic, or softshell hoody makes a great midlayer.
An uninsulated, waterproof shell jacket with hood.
Your expedition-style heavy parka must extend below the waist, have an insulated hood, and be able to fit over the rest of your upper body layers. While the parka is worn primarily at rest breaks on summit day, it also serves as an emergency garment if needed. We recommend down rather than synthetic fill.
We recommend a moisture-wicking, active-wear bra.
Lower Body
We recommend a system of four layers, all of which can be used in conjunction with each other. Products which combine several layers into one garment, such as traditional ski pants, don’t work well as they don’t offer the versatility of a layering system.
Non-cotton briefs or boxers.
Synthetic or wool.
Softshell climbing pants can be worn in combination with a base layer on colder days, or alone on warmer days.
Noninsulated, waterproof shell pants must be able to fit comfortable over your baselayer bottoms and trekking pants. Full-length side zippers are required for facilitating quick clothing adjustments over boots.
A light weight, synthetic pair of pants is a good option for the approach trek when hiking at lower altitudes and in warm conditions. These pants have no insulation, are typically made of thin nylon, and commonly feature zippers to convert between pants and shorts.
Feet
A pair of lightweight boots for approaches and hiking on rugged terrain. We recommend a waterproof, mid-top boot for better stability and ankle support.
Great for traveling and wearing around town or camp. A pair of tennis shoes or light hikers works well.
Large enough to fit over your trekking boots to guard against mud and snow.
Either wool or synthetic. Whatever sock combination you are accustomed to wearing during your training or previous adventures (whether single medium weight socks, a medium weight with a liner sock, two medium weight socks together, etc.), should work just fine for this climb.
First Aid & Medications
We recommend you speak with your physician about which medications you should have for high-altitude climbing. These medications are only used in emergency situations, and if someone is showing symptoms of HAPE or HACE, our standard protocol is for immediate descent. We do not take any of these medications prophylactically, and please talk with your guide before taking medications.
We require each climber to have the following medications:
Broad spectrum antibiotics for respiratory and gastrointestinal problems like Azithromycin (250mg tablets).
4mg tablets for the treatment of altitude illness. Recommend 12 tablets.
125mg tablets for the prevention or treatment of Acute Mountain Sickness. A normal prescription is 125mg tablets, twice a day. Recommend 15 - 20 tablets.
30mg slow-release tablets for the prevention or treatment of high-altitude pulmonary edema (HAPE). Recommend 8 - 10 tablets.
Our guides carry comprehensive medical kits, so keep yours small and light. We recommend a selection of adhesive bandages, antibiotic ointment, Moleskin and blister care, medical tape and/or duct tape, cough drops, basic painkillers, an antacid, an anti-diarrheal, and personal medications.
Personal Items
See the Food tab for suggestions and quantities.
One-liter water bottles with wide mouths made of co-polyester (BPA-free plastic).
Include toilet paper, hand sanitizer, toothbrush and toothpaste, and wet wipes. Bring a quantity appropriate to the duration of your trip.
We recommend small tubes of SPF 30 or higher, which can be carried in pockets for easy access and to prevent freezing.
Spare prescription glasses if you wear contact lenses/eyeglasses.
Practice using this before coming on the climb!
One clearly-marked wide-mouth or collapsible bottle for overnight use.
Daily wash water provided. Towel is used to dry face and hands.
Many smartphones have excellent cameras. Action cameras, small point-and-shoots, and compact dSLRs are lightweight and work well at altitude.
A small power bank, enough to charge a phone or e-reader several times.
For charging personal electronics while traveling internationally.
Travel Clothes
We recommend bringing a selection of clothing to wear while traveling, sightseeing and dining.
Travel Documents
Valid for six months beyond your return date.
The first two pages of your passport.
Pre-Trip Checklist
Purchase travel insurance.
Purchase airplane tickets.
Reserve rental equipment.
Be in the best shape of your life!
Provided Equipment
RMI provides the following equipment for your program: sleeping tents, dining tent, stoves, group cooking equipment, fuel, tables, chairs, and private biological toilet at each camp.
Every guide on your climb will carry rescue equipment and a first aid kit. Each climb has two-way radios and a satellite phone for emergency contact.
Climbers rated RMI with an average of 4.95 stars across 130 ratings


-450x0.jpg)


